Introduction
WordPress powers many business websites, blogs, and online stores. This also makes it a common target for hackers. Many attacks start with weak passwords, fake login attempts, spam bots, or unsafe plugins. These small risks can create serious problems later. A hacked website can lose traffic, trust, rankings, and customer data. That is why WordPress website security should never be ignored.
Every website owner needs simple protection that works daily. You do not always need custom code for basic protection. A good WordPress security plugin can help manage many risks. It can protect login pages, block bad requests, and monitor activity. It can also support better WordPress security settings from one dashboard.
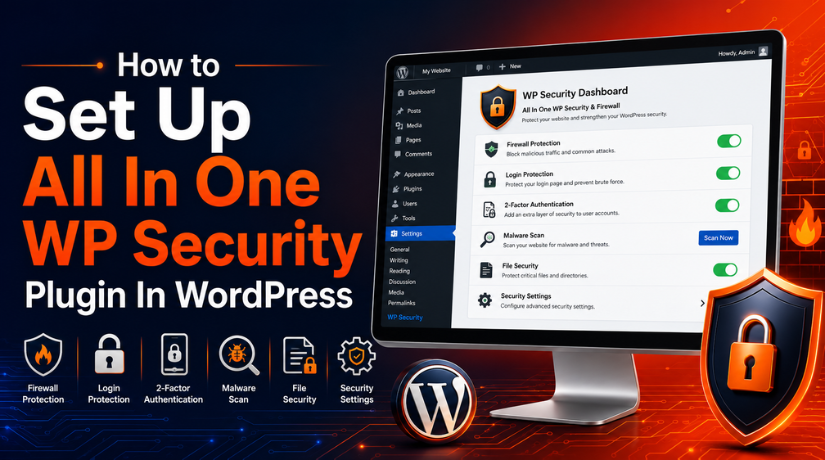
The All In One WP Security plugin is one helpful option. It gives website owners tools to improve protection step by step. This guide explains the plugin in a clear and simple way. It helps beginners understand how to secure WordPress website settings safely.
What Is All In One WP Security Plugin in WordPress?
The All In One WP Security plugin is a popular security tool. It helps protect important areas of a WordPress website. It is also known as AIOS by many WordPress users. This plugin gives users many security controls inside WordPress. You can manage login safety, firewall rules, file protection, and spam controls.
It also helps check user accounts and database-related risks. The plugin is useful because it explains settings in sections. Beginners can start with basic options before using advanced features. This makes it easier to follow a safe WordPress security guide.
Purpose of the All In One WP Security Plugin
The main purpose of this plugin is simple. It adds extra protection layers to your WordPress website. It helps reduce common risks without difficult technical work. Website owners can use it to improve login protection. They can also check file permissions and user account safety.
It supports better WordPress malware protection by reducing weak access points. However, no plugin can make a website fully safe alone. You still need updates, backups, strong passwords, and safe hosting.
Important Safety Checks Before Installing All In One WP Security Plugin
Before installing the All In One WP Security plugin, check your website carefully. Security settings can affect login pages, forms, checkout pages, and admin access. A small wrong setting may block real users. These checks help protect your website before setup. They also make your WordPress website security safer and easier to manage.
Take a Full Website Backup First
Always take a full backup before changing security settings. Your backup should include website files and the database. Files store themes, plugins, uploads, and WordPress core. The database stores posts, users, orders, and settings. A backup helps restore your site if something breaks. This is a basic step in any WordPress security guide.
Update WordPress Core, Themes, and Plugins
Update WordPress, themes, and plugins before installing AIOS. Old software can create weak points for hackers. Remove unused themes and plugins from your website. This helps reduce security risks and plugin conflicts. A clean website works better with any WordPress security plugin.
Remove Other Security Plugins
Avoid using many security plugins on one website. They may control the same login or firewall rules. This can cause lockouts, form errors, or slow loading. Use one main plugin for better control. If you choose AIOS, remove duplicate security tools first.
Keep Hosting or FTP Access Ready
Keep cPanel, FTP, or hosting file manager access ready. This helps if you get locked out later. Login lockdown or IP blocking may stop admin access. Hosting access helps you disable the plugin safely. It also helps restore files when needed.
Test Important Website Features First
Test your website before changing WordPress security settings. Check the login page, contact form, checkout page, and registration page. Also test your search box and admin dashboard. If you use a page builder, test that too. These checks help you find problems after setup.
Do Not Enable Every Option at Once
Do not turn on every security option immediately. Some advanced rules may block forms or checkout requests. Start with basic settings and test the website. Then enable more options only when needed. This helps secure WordPress website settings without causing problems.
Complete Guide to Setting Up All In One WP Security in WordPress
Setting up the All In One WP Security plugin becomes easier with clear steps. Follow each setting slowly and test your website after changes. This helps improve WordPress website security without creating errors.
Step 1: Install and Activate the All In One WP Security Plugin
- Log in to your WordPress dashboard first.
- Go to Plugins > Add New from the menu.
- Search for All In One WP Security or AIOS.
- Check that you are installing the official plugin.
- Click Install Now and wait for completion.
- Click Activate after the installation is finished.
- Open the new AIOS or WP Security menu.
- This starts your WordPress security plugin setup process.
Step 2: Open the AIOS Dashboard and Review the Security Score
- Open the AIOS dashboard from your WordPress menu.
- Check the security score shown on the dashboard.
- Review active and inactive security features carefully.
- Use the score as a basic guide only.
- Do not treat the score as full protection.
- Read each setting before enabling any option.
- This helps manage WordPress security settings safely.
Step 3: Start With Basic WordPress Security Settings
- Start with basic settings before advanced options.
- Basic settings are safer for most websites.
- Enable one setting group at one time.
- Test your website after each important change.
- Avoid turning on all options together.
- This helps you find issues quickly.
- Safe setup helps secure WordPress website access better.
Step 4: Set Up Login Security to Stop Bad Login Attempts
- Open the login security section inside AIOS.
- Enable login lockdown for failed login attempts.
- Set a safe limit for wrong password tries.
- Add a lockout time for blocked users.
- Enable email alerts for repeated login failures.
- Use strong passwords for all admin users.
- Avoid using “admin” as the username.
- This improves login safety and blocks many bots.
Step 5: Enable Two-Factor Authentication for Admin Users
- Open the two-factor authentication settings in AIOS.
- Enable 2FA for administrator accounts first.
- Add 2FA for editors and store managers too.
- These users often access important website areas.
- Save recovery codes in a safe place.
- Do not store recovery codes inside WordPress.
- This adds stronger protection after password login.
Step 6: Check and Protect User Accounts
- Review all user accounts on your website.
- Remove users who no longer need access.
- Change weak passwords for important accounts.
- Do not give admin access to everyone.
- Use lower roles when full access is unnecessary.
- Check public display names for all users.
- Do not show usernames as public display names.
- This supports better WordPress malware protection.
Step 7: Configure Basic Firewall Protection
- Open the firewall section inside the plugin.
- Enable basic firewall rules before advanced rules.
- These rules help block harmful website requests.
- Avoid advanced firewall settings at the beginning.
- Some rules may block forms or APIs.
- Test your homepage and login page carefully.
- Also test forms, checkout, and admin dashboard.
- This improves WordPress website security safely.
Step 8: Set Up File System Security
- Open the file system security section.
- Check file permission warnings shown by AIOS.
- Fix only settings you clearly understand.
- Disable theme and plugin file editing.
- This protects files from direct dashboard edits.
- Enable file change monitoring when needed.
- Review alerts before taking any action.
- Normal updates may also change website files.
Step 9: Review Database Security Settings Carefully
- Open the database security section in AIOS.
- Back up your database before any changes.
- Review database prefix and security warnings.
- Do not change settings without understanding them.
- The database stores users, posts, and settings.
- A small mistake can break your website.
- Beginners should take expert help when needed.
- This step supports safer WordPress security guide setup.
Step 10: Add Spam and Bot Protection
- Open the spam protection section in AIOS.
- Enable comment spam protection if comments are active.
- Monitor repeated spam IP addresses carefully.
- Block clear spam sources when needed.
- Add CAPTCHA only where it is useful.
- Start with login or registration pages first.
- Avoid too many CAPTCHA checks for users.
- This keeps website activity cleaner and safer.
Step 11: Review Logs and Active Sessions
- Open the logs section inside AIOS.
- Check failed login attempts on a regular basis.
- Review blocked IP addresses and user sessions.
- Log out unknown active sessions quickly.
- Watch repeated alerts from the plugin.
- Repeated alerts may show attack attempts.
- They may also show wrong plugin settings.
- Regular checks make security stronger over time.
Step 12: Save Settings and Test Your Website
- Save settings after each important change.
- Test login, logout, and password reset.
- Check contact forms and registration pages.
- Test checkout if your website uses WooCommerce.
- Open the admin dashboard and page builder.
- Check your website on mobile devices too.
- Clear cache if you use a cache plugin.
- Disable the last setting if something breaks.
Common Problems After AIOS Setup and How to Fix Them
The All In One WP Security plugin works well when configured carefully. Still, some settings may create small issues after setup. These problems usually happen because of strict login, firewall, or spam rules. You can fix most issues by checking the last setting changed. This section helps you solve common problems safely.
Locked Out of WordPress Admin After Setup
Admin lockout is a common issue after security setup. It may happen due to login lockdown or IP blocking. It can also happen after changing the login URL. First, check if you are using the correct login link. Then try another browser or another internet connection. If access still fails, use a hosting file manager or FTP.
Contact Form Stops Working After Security Changes
A contact form may stop working after firewall changes. CAPTCHA or spam settings may also block form submissions. First, disable the last security setting you changed. Then test the form again from the front end. If it works, adjust that setting more carefully. Also clear website cache after changing security rules.
WooCommerce Checkout Issue After Firewall Setup
WooCommerce checkout may fail due to strict firewall rules. Some rules can block payment or cart requests. This can affect payment gateways and customer orders. First, test checkout after every major setting change. Then check if REST API or AJAX requests are blocked. Disable advanced firewall options if checkout stops working.
Website Becomes Slow After AIOS Setup
A website may slow down after enabling many features. Heavy logs, scans, or alerts can increase server load. Duplicate security plugins may also reduce website speed. First, remove extra security plugins from your website. Then clear old logs inside the plugin settings. Disable features you do not use often.
False IP Blocking After Login Protection
False IP blocking can stop real users from accessing WordPress. This may happen when lockout rules are too strict. Your own IP may also get blocked by mistake. Open the plugin settings and remove trusted IPs from blocks. Reduce failed login limits if needed.
Plugin Conflict Issue With Other WordPress Tools
Plugin conflicts may happen with caching or login plugins. They can also happen with forms, membership tools, or firewalls. First, disable the latest setting you enabled. Then clear cache and test your website again. If the issue stays, deactivate duplicate security tools.
Conclusion
The All In One WP Security plugin can help improve website protection. It gives useful tools for login safety, firewall rules, file checks, user accounts, and spam control. However, safe setup is very important. You should not enable every option at once. Start with a full backup, basic settings, and regular testing. Then review your WordPress security settings based on your website needs. This careful process helps create a more secure WordPress website without blocking real users or breaking important features.
For help with WordPress security setup, plugin checks, or website safety issues, you can visit WP Chat Support. You can also call their listed support number: +1 888 602 0119. Their website provides WordPress and WooCommerce support details for users who need technical guidance.
James is an experienced WordPress and WooCommerce specialist with over 10 years of practical experience. At WPChatSupport, he creates clear guides that help website owners fix WordPress issues, improve speed, secure their sites, and manage WooCommerce stores with confidence. His expertise includes store setup, plugin configuration, theme customization, payment gateway integration, and website troubleshooting. Through simple and helpful content, James supports users in solving technical problems and following best practices for online business growth.
