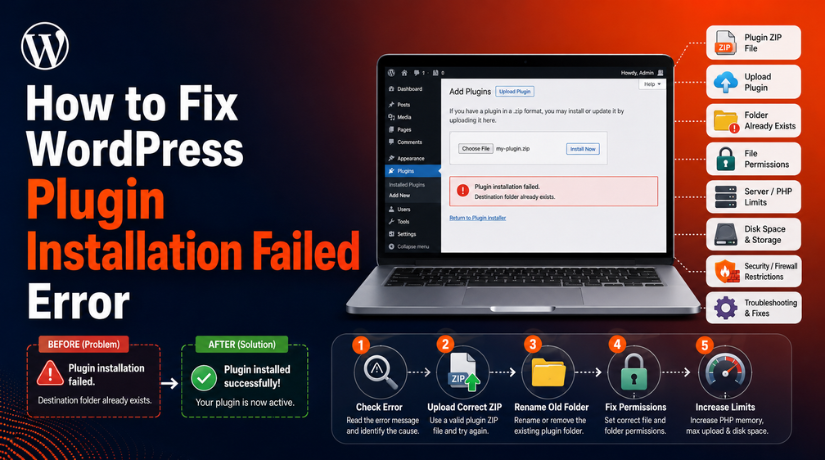
Introduction
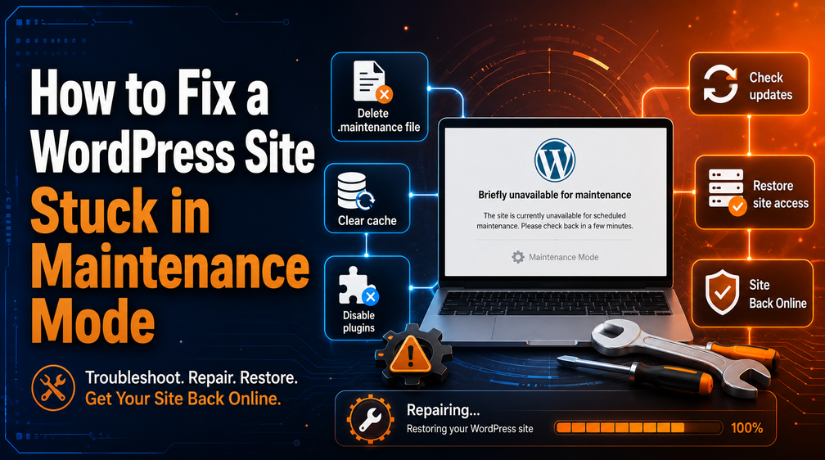
Seeing your website suddenly go offline can feel stressful. Many users see this message after an update: “Briefly unavailable for scheduled maintenance. Check back in a minute.” This message usually appears when WordPress updates core files, plugins, or themes. In most cases, it goes away within a few seconds. However, sometimes the message stays on the screen. This means your WordPress site is stuck in maintenance mode.
A WordPress maintenance mode error can stop visitors from opening your website. It may also stop customers from buying products. If you run a business website, this can affect leads and trust. A WordPress website not loading after update can also create worry for site owners. The good news is that this issue is usually easy to fix. Most of the time, WordPress only fails to remove one temporary file.
This guide will explain why this problem arises. Additionally, you will discover how to safely restore WordPress maintenance mode. Later sections will describe how to use File Manager, FTP, cache cleaning, and plugin tests to get WordPress out of maintenance status.
Why Does a WordPress Site Get Stuck in Maintenance Mode?
WordPress enters maintenance mode to protect your website during updates. This is a normal process. It helps stop visitors from seeing broken pages while files change. The problem starts when the update does not finish properly. If WordPress cannot complete the process, it may fail to delete the .maintenance file. As a result, your WordPress site is stuck after update stays unavailable.
Interrupted WordPress Update Can Leave the Site in Maintenance Mode
One of the most frequent reasons is a disrupted update. Closing the browser tab too soon can cause this. Additionally, it might occur if your internet connection fails while the update is running. Occasionally, users reload the page before WordPress finishes. Midway through the update, these activities might halt it.
Updating Too Many Plugins at Once Can Create Server Load
Bulk updates can also cause this issue. Many users update all plugins together from the dashboard. This looks easy, but it can overload the server. One plugin may fail during the update. Then the complete update process may stop. This problem is more common on shared hosting plans.
Plugin or Theme Conflict Can Stop WordPress Updates
This problem may potentially be brought on by a theme or plugin incompatibility. Certain plugins might not function properly with the most recent version of WordPress. Certain themes might also have out-of-date code. The procedure can fail when WordPress tries to update them. A conflict may prevent WordPress from completing the update. As a result, your website might not be accessible.
Slow Hosting Server Can Cause WordPress Update Timeout
A slow hosting server may fail to complete updates on time. WordPress needs stable server resources during updates. If the server times out, the update may stop suddenly. This can leave the site locked in maintenance mode. This problem often happens on low-quality hosting. It can also happen when the website has heavy plugins.
Low PHP Memory Limit Can Break the Update Process
PHP memory is necessary for WordPress to function properly during updates. A low memory limit could cause the update to stop. Updates for WordPress core, plugins, and themes may be impacted. Another possible cause of a WordPress maintenance mode issue is a low memory limit. Removing the maintenance file could resolve the front-end problem in certain situations.
Wrong File Permissions Can Stop WordPress from Removing the File
File permissions control how WordPress reads and changes files. If permissions are wrong, WordPress may not delete files properly. This includes the temporary.maintenance file. When WordPress cannot remove this file, maintenance mode stays active. This can make the website look broken, even after the update has stopped. Fixing file permissions may be needed if the issue returns often.
Step By Step Guide to Fix WordPress Site Stuck in Maintenance Mode
Step 1: Wait for a Few Minutes First
- Do not make changes immediately.
- WordPress may still be updating files.
- Wait for at least five to ten minutes.
- Slow hosting can make updates take longer.
- Do not close the update screen early.
- Do not refresh the page again and again.
- If the message still appears, the WordPress update failed.
- Your WordPress site may be stuck after updating.
Step 2: Open Your Hosting File Manager
- Log in to your hosting account.
- Open the File Manager option.
- You may find it inside cPanel, hPanel, or Plesk.
- Now open your main WordPress folder.
- This folder is usually named public_html.
- It may also be named www, htdocs, or your domain name.
- This step helps you access the WordPress maintenance file.
Step 3: Find the Correct WordPress Folder
- Check that you are in the right folder.
- The correct WordPress folder usually has these files:
- wp-admin
- wp-content
- wp-includes
- wp-config.php
- If you see these files, you are in the correct folder.
- Do not delete any other file without checking.
- This helps you fix WordPress maintenance mode safely.
Step 4: Find and Delete the .maintenance File
- Look for the file named .maintenance.
- This is the temporary WordPress maintenance file.
- It is created during WordPress updates.
- If this file stays, your site remains in maintenance mode.
- Select the .maintenance file.
- Delete it from the WordPress root folder.
- This step can remove maintenance mode WordPress quickly.
- Now open your website in a new browser tab.
Step 5: Enable Hidden Files If You Cannot See It
- Sometimes the .maintenance file is hidden.
- This happens because the file starts with a dot.
- Open the File Manager settings.
- Enable Show Hidden Files or Show Dotfiles.
- Refresh the WordPress root folder.
- Check again for the .maintenance file.
- Delete the file if you find it.
- This can fix the WordPress maintenance mode error.
Step 6: Use FTP or SFTP If File Manager Is Not Available
- Use FTP or SFTP if the File Manager is not working.
- You can use tools like FileZilla, Cyberduck, or WinSCP.
- Enter your FTP or SFTP login details.
- Connect to your website server.
- Open the WordPress root folder.
- Find the .maintenance file.
- Delete the file from the server.
- SFTP is safer because it uses a secure connection.
Step 7: Clear Cache and Check Your Website
- Clear your browser cache first.
- Clear your WordPress cache plugin if possible.
- Clear hosting cache from your hosting dashboard.
- Clear CDN cache if your site uses one.
- Also clear Cloudflare cache if connected.
- Open your website again in a fresh browser tab.
- Check if the website loads normally.
- In most cases, this will fix WordPress maintenance mode.
What to Do If Deleting the .maintenance File Does Not Fix the Issue
Step 1: Clear All Website Cache After Removing the Maintenance File
- Sometimes the issue is fixed, but cache still shows it.
- Clear your browser cache and reload the website again.
- Also clear your WordPress cache plugin from the dashboard.
- Clear hosting cache from your hosting control panel.
- If you use Cloudflare, purge the full CDN cache.
- This step helps remove old saved maintenance pages.
- It can fix WordPress maintenance mode after file deletion.
Step 2: Check If Any WordPress Plugin Update Failed
- An unsuccessful plugin update could prevent your website from working.
- Try to access your WordPress dashboard.
- Visit the Plugins page to see any updates.
- Look for plugins that were improperly updated.
- Reinstall each unsuccessful plugin one at a time.
- Don’t update several plugins at once.
- This lessens the likelihood of another WordPress update failure.
Step 3: Disable All Plugins Manually from File Manager
- Use this step if the dashboard is not opening.
- Open your hosting File Manager or FTP account.
- Go to the wp-content folder.
- Find the folder named plugins.
- Rename it to plugins-old for some time.
- This will disable all WordPress plugins at once.
- Now open your website in a fresh browser tab.
- If the site loads, one plugin causes the issue.
- Rename the folder back to plugins after checking.
- Activate plugins one by one from the dashboard.
- This helps find the faulty plugin safely.
Step 4: Switch to a Default WordPress Theme Safely
- A failed theme update can also break your website.
- Open File Manager or FTP on your hosting account.
- Go to the wp-content/themes folder.
- Find your active theme folder inside this location.
- Rename the active theme folder for testing.
- WordPress may switch to a default theme automatically.
- Now check if the website starts loading again.
- If it loads, your theme may be the issue.
- Update, repair, or replace the broken theme carefully.
Step 5: Complete the Failed WordPress Update Again
- A WordPress site stuck after an update may need rechecking.
- Log in to the WordPress dashboard if it opens.
- Go to Dashboard > Updates and check pending updates.
- Complete the failed WordPress core update if available.
- Update plugins and themes one by one only.
- Do not close the update page before completion.
- This helps fix WordPress maintenance mode completely.
- It also prevents broken files from staying active.
Step 6: Restore a Recent Website Backup If Needed
- Restore a backup only when other steps do not work.
- Use a backup created before the failed update.
- A full backup should include files and databases.
- Many hosting companies offer one-click backup restore.
- Backup plugins can also help restore your website.
- After restoring, check your homepage and admin area.
- Also test forms, menus, and important website pages.
- This is useful when WordPress website is not loading after update.
Step 7: Contact Hosting Support or WordPress Experts
- Contact hosting support if the issue still continues.
- Ask them to check server logs and timeout errors.
- They can also check PHP memory and file permissions.
- Wrong permissions can stop WordPress from removing files.
- Low memory can also cause repeated update failures.
- Do not make random changes without proper knowledge.
- Expert help can prevent more damage to your website.
- This is best for business and WooCommerce websites.
How to Prevent WordPress Sites from Getting Stuck Again
Update Plugins and Themes One by One
Avoid updating all plugins and themes together. Bulk updates can create extra server load. One failed update can stop the full process. Update one plugin or theme at a time. After each update, check your website carefully. This helps you find problems faster. It also reduces the risk of a WordPress update failing.
Do Not Close the Update Screen Too Early
Always wait until WordPress finishes the update. Do not close the browser tab during the process. Also, avoid refreshing the page again and again. Let WordPress show the final update message. Closing the page too early can interrupt the update. This may leave the WordPress maintenance file active.
Take a Full Website Backup Before Major Updates
Make a complete backup before making any significant changes. If something goes wrong, your website is safeguarded by a backup. It also helps when you update your WordPress website and it still doesn’t load. Website files, databases, plugins, themes, and media files should all be in your backup. You have two options: a reliable backup plugin or your hosting backup utility.
Use a Staging Website for Safe Testing
A staging site is a copy of your live website. You can test updates there before changing the live site. This helps you find plugin or theme conflicts early. It is very useful for business websites and WooCommerce stores. After testing everything, you can update the live website safely.
Keep WordPress, Plugins, and Themes Compatible
Check plugin and theme compatibility before updating them. Avoid plugins that have not been updated for a long time. Remove themes that are no longer supported. Use trusted plugins from reliable developers. You should also read changelogs before major updates. Compatibility checks reduce update failure risks.
Use Reliable Hosting with Enough Server Resources
Good hosting helps WordPress updates run smoothly. Slow hosting can cause timeout errors during updates. Low server resources may stop updates midway. Choose hosting with enough PHP memory and stable performance. Also, make sure your server uses a supported PHP version. Reliable hosting can prevent repeated update problems.
Remove Unused Plugins and Themes Regularly
An excessive number of plugins can cause your website to lag. Additionally, unused plugins may pose security threats. Remove any plugins that are no longer in use. Delete outdated themes from the dashboard of your WordPress site. Just your primary theme and one backup theme should be kept. There are fewer update conflicts when there are fewer plugins. By doing this, a WordPress website won’t become stuck after updating.
Conclusion
A WordPress site stuck in maintenance mode can look serious at first. However, it is usually easy to fix with the right steps. In most cases, deleting the .maintenance file can bring your website back online. You should also clear cache after removing the file. If the issue continues, check failed updates, plugin conflicts, theme errors, and hosting limits.
Update each plugin and theme separately to prevent this problem in the future. Prior to large changes, always make a complete backup. A staging website is another option for safely testing updates. These practices can keep your website reliable and lessen WordPress update failure problems.
If your WordPress website is still not loading after update, you can review the issue with a WordPress support team. WP Chat Support provides WordPress help for maintenance mode errors, failed updates, plugin issues, and website troubleshooting. For more details, visit WP Chat Support or call +1 888 602 0119.
James is an experienced WordPress and WooCommerce specialist with over 10 years of practical experience. At WPChatSupport, he creates clear guides that help website owners fix WordPress issues, improve speed, secure their sites, and manage WooCommerce stores with confidence. His expertise includes store setup, plugin configuration, theme customization, payment gateway integration, and website troubleshooting. Through simple and helpful content, James supports users in solving technical problems and following best practices for online business growth.