Introduction
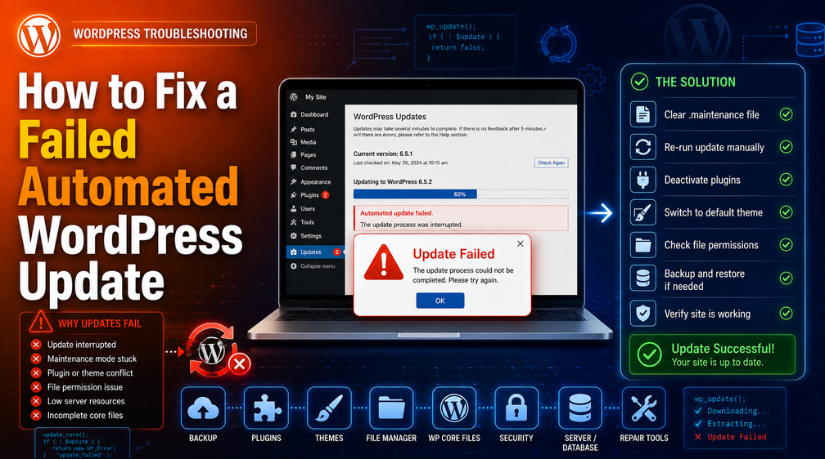
WordPress updates are important for every website owner. They help keep your website safe, fast, and stable. Most updates run in the background without any problem. These updates may include WordPress core, plugins, themes, or translations. But sometimes, the update process stops before it completes. When this happens, users may see a WordPress update failed message. In some cases, the website may also stop loading properly.
A failed WordPress update can look stressful at first. Your website may show a blank screen or error page. The dashboard may not open like normal. Sometimes, the website gets stuck in temporary maintenance mode. This issue is also called WordPress maintenance mode stuck. It usually happens when WordPress cannot finish the update process.
This guide will help you understand the issue clearly. You will learn what causes a WordPress automatic update failed problem. You will also learn the safe steps to fix failed automated WordPress update issues. Before making changes, always take a full website backup. This helps protect your website if anything goes wrong.
What is a Failed Automated WordPress Update?
A failed automated WordPress update means the update started normally. But it stopped before WordPress could complete the full process. This can happen during a WordPress core update. It can also happen during plugin or theme updates. When this issue happens, some files may update correctly. Other files may remain old or incomplete. This can make your website act strangely.
WordPress follows a clear update process in the background. First, it checks for available updates. Then it downloads the update package from the correct source. After that, WordPress places your site in maintenance mode. This step tells visitors that updates are running. Next, WordPress replaces the old files with new files. When everything finishes, WordPress removes the temporary maintenance file.
If the process stops midway, the temporary file may stay there. This can make your WordPress update stuck on the website. Visitors may see a maintenance message instead of your website. You may also see a WordPress update failed notice inside the dashboard. This usually means the update could not be completed properly.
Precautions Before Fixing a Failed Automated WordPress Update Safely
Before you fix a failed automated WordPress update, take safety steps first. These steps help protect your website from extra damage.
Take a full website backup before starting the fix
First and foremost, a complete backup is essential. It provides you with a secure duplicate of your website. Should something go wrong, it can be fixed. You should include the database and website files in your backup. Back up the wp-content folder as well. Themes, plugins, and uploaded material are stored in this folder. A copy of wp-config.php should also be kept. Before making any modifications, save the.htaccess file as well.
Keep your hosting and file access ready
Certain fixes might not be compatible with the WordPress dashboard. This is the result of the dashboard not loading. Hosting access therefore becomes crucial. Access to File Manager, FTP, or SFTP might be necessary. cPanel or hosting error logs can also be required. With the aid of these tools, you can immediately inspect website files.
Do not delete important WordPress files
When a WordPress automatic update failed, avoid random file deletion. Do not delete the wp-content folder. Do not delete the wp-config.php file. Do not remove your uploads folder. Also, do not delete database tables without expert help. These files and folders keep your website content safe. Wrong deletion can create bigger problems for your site.
Check if the update is still running
Sometimes, the WordPress auto update error is only temporary. The server may still be finishing the update. Wait a few minutes before making changes. Do not refresh the update page many times. After waiting, check your website again. If the same error appears, start the fix carefully.
Use staging for important websites
A staging website is a copy of your live site. It helps you test fixes before live changes. This is useful for WooCommerce and booking websites. It also helps membership and high-traffic websites. Staging reduces risk during a failed WordPress update repair.
Failed Automated WordPress Update (How to Fix It Safely)
A failed automated WordPress update should be fixed step by step. Do not make random changes to your website files. Start with the simple fixes first. Then move to advanced steps if needed. This helps protect your website content and settings.
Step 1: Delete the hidden maintenance file
- Use this step when WordPress maintenance mode is stuck appears.
- Your site may show a scheduled maintenance message.
- This happens when the update stops midway.
- Log in to your hosting account. Open File Manager or use FTP access.
- Go to the main WordPress root folder.
- Find wp-admin, wp-content, and wp-includes.
- Enable hidden files if you cannot see them.
- Find the .maintenance file in the root folder.
- Delete only the .maintenance file.
- Refresh your website and WordPress dashboard.
Step 2: Clear all website cache
- Old cache may still show the update error.
- The failed WordPress update may already be fixed.
- First, clear your browser cache. Then clear your WordPress cache plugin.
- Also clear hosting cache from your hosting panel.
- Clear CDN cache if your website uses one.
- If using Cloudflare, purge the full cache.
- Test the website in incognito mode.
- Also test it on another device if needed.
Step 3: Try the update again carefully
- Log in to your WordPress admin dashboard.
- Go to Dashboard → Updates.
- Check WordPress core updates first.
- Then check plugin, theme, and translation updates.
- Do not update everything together.
- Update one item at a time. Test your website after each update.
- If the WordPress update failed again, stop updating.
- Then check plugins, themes, and server settings.
Step 4: Disable plugins to check conflicts
- Plugins often cause a WordPress auto update error.
- If the dashboard works, open the Plugins page.
- Deactivate all plugins for a short test.
- Check if the website starts working again.
- If it works, activate plugins one by one.
- Test the website after each plugin activation. This helps find the problem plugin.
- If the dashboard does not work, use FTP.
- Open the wp-content folder. Rename plugins to plugins-old.
- This disables all plugins at once. Check your website again.
- If it works, one plugin caused the issue.
Step 5: Switch to a default WordPress theme
- If plugins are not the issue, check your theme.
- A theme conflict can cause a failed WordPress update.
- You may see broken layouts or critical errors.
- You may also see missing header or footer sections.
- Switch to a default WordPress theme for testing.
- Check your website after changing the theme.
- If the site works, your theme caused the issue.
- Update, reinstall, or repair the theme safely.
Step 6: Use WordPress Recovery Mode
- WordPress Recovery Mode helps with critical errors.
- It may send a recovery link to the admin email.
- Check your inbox and spam folder.
- Open the recovery link from the email.
- Log in to your WordPress dashboard safely.
- WordPress may show the failed plugin or theme.
- Disable the failed item from the dashboard.
- Test your website again. If fixed, update or replace that item.
Step 7: Check file permissions
- Wrong file permissions can stop WordPress updates.
- You may see “Could not create directory.”
- You may also see “Permission denied” errors.
- File copy errors can also appear during updates.
- Folders often use 755 permissions.
- Files often use 644 permissions. Avoid using 777 permissions.
- It can create security risks.
- File ownership should match the server user.
- Contact hosting support if ownership is wrong.
Step 8: Check PHP and server limits
- Low server resources can stop WordPress updates.
- This may cause WordPress automatic update failed issues.
- Check your current PHP version.
- Check the PHP memory limit. Check the max execution time.
- Also check available disk space.
- Review hosting CPU limits if possible.
- Large plugins may need more server resources.
- Ask hosting support to increase limits if needed.
Step 9: Manually update WordPress core
- Use this step only when normal updates fail.
- Take a full backup before starting.
- Do not delete wp-content. Do not delete wp-config.php.
- Do not delete the uploads folder.
- Download the latest WordPress package.
- Extract the ZIP file on your computer.
- Remove wp-content from the new package.
- Connect with FTP or File Manager.
- Upload fresh wp-admin and wp-includes folders.
- Upload other root files carefully.
- Do not overwrite wp-config.php.
- Check your dashboard and website again.
Step 10: Check error logs
- Error logs can show the real cause.
- Check hosting logs from your control panel.
- Also check wp-content/debug.log if available.
- Look for fatal error messages.
- Check for memory exhausted errors.
- Look for permission denied errors. Review plugin and theme errors.
- Also check PHP compatibility errors.
- These details help fix failed automated WordPress update issues.
- They also help avoid unsafe guessing.
How to “Failed Automated WordPress Update” Issue in the Future
With a little attention, you may minimize failed update problems. Updates for WordPress are crucial for both security and functionality. However, they must be managed safely. Numerous errors can be avoided with a good update plan. Additionally, it might lessen website maintenance and downtime.
Always take a backup before running updates
Your best precaution is to make a new backup. If necessary, it aids in the website’s restoration. Prior to significant WordPress upgrades, make a backup. Prior to theme and plugin upgrades, take one as well. Databases and website files should be included of the backup. Keep the backup somewhere secure. Don’t store a single copy on the server. Whenever possible, use remote or cloud storage.
Use a staging website before major changes
A staging site is a copy of your live website. It helps you test updates without risk. You can check plugins, themes, and WordPress core there. This is useful for WooCommerce and booking websites. It is also helpful for membership and business websites. If the update fails on staging, your live site stays safe.
Update plugins, themes, and WordPress one by one
Do not update everything together at once. This makes it hard to find the issue. Start with a full backup first. Then update plugins one by one. After that, update your theme carefully. Then update WordPress core if needed. Clear cache after the updates are complete. Finally, test the main pages and forms.
Keep only trusted plugins and themes
Update issues can arise from outdated plugins. Website danger can also be increased by unused plugins. Get rid of any plugins you don’t use. Eliminate themes that are not in use. Steer clear of plugins that are out of maintenance. Use dependable plugins made by reputable developers. Prior to every significant upgrade, make sure it is compatible.
Keep your hosting environment updated
Your hosting setup also affects WordPress updates. Use a supported PHP version for better results. Keep enough disk space on your hosting account. Check file permissions from time to time. Also review server error logs when issues appear. A weak server can cause a WordPress automatic update failed issue.
Test your website after every update
After updates, check your website carefully. Open your homepage and important service pages. Test contact forms, checkout, login, and search. Check mobile layout and page speed too. Also make sure the dashboard works correctly.
Conclusion
A failed automated WordPress update can feel stressful at first. But most update issues can be fixed safely. Start with simple steps before trying advanced fixes. Check if WordPress maintenance mode is stuck on your website. Then remove the hidden .maintenance file if needed. After that, clear cache and check the update again. If the WordPress update failed again, review plugins, themes, permissions, and server limits. A full backup also helps protect your website data. Safe update habits can prevent many future problems.
If your WordPress automatic update still failed, expert support can help you review it safely. The team at WPChatSupport can check update errors, plugin conflicts, theme issues, and server-related problems. You can visit https://wpchatsupport.com/ or call +1 888 602 0119 for WordPress support guidance.

James is an experienced WordPress and WooCommerce specialist with over 10 years of practical experience. At WPChatSupport, he creates clear guides that help website owners fix WordPress issues, improve speed, secure their sites, and manage WooCommerce stores with confidence. His expertise includes store setup, plugin configuration, theme customization, payment gateway integration, and website troubleshooting. Through simple and helpful content, James supports users in solving technical problems and following best practices for online business growth.