Introduction
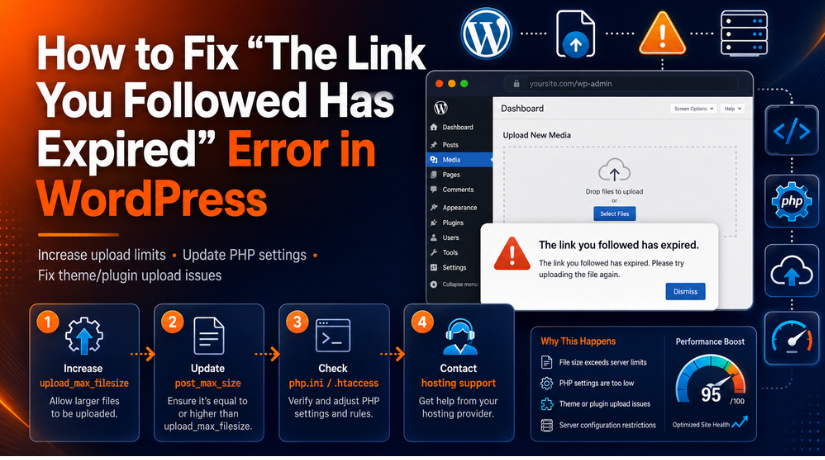
Seeing “the link you followed has expired” can feel confusing. This error often appears inside the WordPress dashboard. It may show while uploading a theme, plugin, or media file. It may also appear when you save settings after waiting too long. Many users think the link is broken. However, that is not always true. In most cases, WordPress cannot complete the action properly.
This issue is common during theme and plugin uploads. It can also happen because of a wordpress upload error. Your website server may stop the upload before it finishes. This often happens when the file is larger than the allowed size. In that case, the wordpress file upload limit may be too low. Some hosting plans also set strict PHP limits by default.
The good news is that this error is usually fixable. You do not always need advanced coding skills. You can start with simple checks first. Then, you can move to safe technical fixes. This guide will explain the issue clearly. It will also help you understand why the error appears. Protecting your website should always come before making any changes. In the event of an issue, a backup can save your website.
What Does “The Link You Followed Has Expired” Mean in WordPress?
It’s not always the case that an old link is shown by the notification “the link you followed has expired.” It indicates that WordPress was unable to validate or complete your activity. Security checks are implemented within the admin area of WordPress. These tests aid in verifying the safety of the action. Additionally, they aid in defending your website against intrusive queries.
When these checks fail, WordPress may show this message. This can happen if your login session becomes old. It can also happen if an upload takes too long. Sometimes, cache can load an old admin page. Then WordPress may reject the request for safety reasons.
This error is often seen during large theme uploads. It may also appear during a wordpress plugin upload error. For example, your plugin file may be 80 MB. But your server may allow only 32 MB uploads. WordPress cannot process that file correctly. As a result, the upload may fail with this message.
The issue can also relate to PHP settings. Common values include wordpress upload_max_filesize and wordpress memory limit. These settings control file size and server power. If they are too low, WordPress may not complete the upload. So, to fix the link you followed has an expired WordPress error, you first need to know the real cause.
List of Common Causes of “The Link You Followed Has Expired” Error
Low WordPress File Upload Limit
One of the most typical reasons is a limited upload limit for WordPress files. Your hosting server controls how large each uploaded file can be. If your theme or plugin file is bigger than this limit, WordPress may stop the upload. This can show “the link you followed has expired” instead of a clear upload message.
Large Theme or Plugin File Size
Many premium themes and plugins include demo data, builders, images, and templates. These files can become large. When you upload them through the WordPress dashboard, the server may fail to process them. This can create a wordpress upload error or a wordpress plugin upload error during installation.
Low WordPress upload_max_filesize Value
The wordpress upload_max_filesize setting controls the maximum file size allowed by PHP. If this value is too small, WordPress cannot upload large files. For example, a 70 MB theme will not upload if the limit is only 32 MB. Increasing this value often helps fix the error.
Low WordPress Memory Limit
WordPress’s memory limit regulates the amount of server RAM it can utilise. Large uploads or updates might not be completed by WordPress if the memory limit is too low. Installing plugins, uploading themes, or doing laborious administrative activities can cause this.
Expired WordPress Admin Session
WordPress uses secure admin sessions to protect your website. If you keep an admin page open for a long time, the session may expire. When you click upload, save, or update later, WordPress may reject the action. This can trigger “the link you followed has expired” message.
Browser, Plugin, Hosting, or CDN Cache Issue
Cache can sometimes load an old WordPress admin page. This may happen through browser cache, cache plugins, hosting cache, or CDN tools. When WordPress receives an old request, it may fail the security check.
lugin Conflict Inside WordPress
Some plugins can interfere with admin actions. Cache, security, optimization, and upload-related plugins are common examples. If a plugin blocks or changes the request, WordPress may fail to complete the action. This can lead to a wordpress plugin upload error or expired link message.
Theme Conflict or Outdated Theme Code
An outdated or poorly coded theme can also cause admin issues. This is less common, but it can happen after theme updates. If the error starts after changing or updating a theme, the theme may be involved. Testing with a default WordPress theme can help confirm this.
Hosting Restrictions and Server Limits
Certain hosting packages have stringent upload, memory, and execution restrictions. Plans for shared hosting frequently feature lower restrictions than those for managed or VPS hosting. This issue could appear in WordPress if your server is unable to handle big files. In this situation, hosting support might have to raise the limitations.
Outdated PHP Version
An outdated PHP version can create compatibility issues with WordPress. Modern themes and plugins need a stable PHP version to work properly. If PHP is too old, uploads and updates may fail. Updating PHP through your hosting panel can improve site speed, safety, and compatibility.
Precautions Before Fixing the Error in WordPress
Take a Full Backup Before Making Any Changes
Always take a full website backup before fixing this error. Your backup should include website files and the database. This step is important before editing WordPress files. Files like .htaccess, wp-config.php, and php.ini are sensitive. A small mistake can create a new website error. A backup gives you a safe restore point. If something breaks, you can recover your site quickly.
Use a Staging Website for Safer Testing
A replica of your live website is called a staging website. It enables you to test modifications without endangering users. This helps with server or upload problems. You may securely test code edits, theme changes, and plugin modifications. Use a fix live if it works in staging. Your primary website remains secure in the event of a failure. This is a wise move for active websites.
Check the File Size Before Changing Server Settings
Before editing anything, check the file size first. Compare it with your current upload limit. You can check the limit from Media → Add New. If your file is larger, you have found the likely cause. This avoids unnecessary changes to important files. It also helps you choose the right fix faster.
Note Current PHP Values Before Updating Them
You should note your current PHP values before changes. Check values like upload size, post size, memory, and execution time. These values help you compare before and after results. They also help your hosting support understand the issue. If the new values do not work, you can restore old ones. This makes troubleshooting safer and more organized.
Avoid Editing Many WordPress Files at Once
Avoid making numerous changes at once. Finding the true issue becomes challenging as a result. Once you’ve tested one fix, proceed. For instance, modify the PHP hosting settings first. Try the upload once again after that. Try a different secure approach if it doesn’t work. Errors are minimised by this meticulous procedure. Additionally, it helps you steer clear of fresh WordPress issues.
Keep FTP or Hosting File Manager Access Ready
Keep FTP, SFTP, or File Manager access ready before editing files. If your website shows a 500 error, you may need quick access. You can remove the faulty code and restore the site. This is useful when editing .htaccess or wp-config.php. Without file access, fixing a broken site becomes harder.
Contact WordPress Experts If You Are Unsure
Some fixes need care and technical knowledge. If you are not sure, do not guess. Wrong changes can break your website or affect uploads. A WordPress expert can check the cause safely. They can review PHP limits, cache, plugins, and hosting settings.
Steps to Fix “The Link You Followed Has Expired” Error in WordPress
Step 1: Refresh the WordPress Admin Page First
- Start with this simple step before changing website files.
- Refresh the WordPress admin page once.
- Try the same upload or update again.
- If the link you followed has expired still appears, log out.
- Log in again using your WordPress admin details.
- Now repeat the same action inside the dashboard.
- This can fix the issue when your admin session is old.
Step 2: Clear Your Browser and Website Cache
- Clear your browser cache first.
- Then clear your WordPress cache plugin.
- Also clear the hosting cache from your hosting panel.
- If you use a CDN, clear the CDN cache too.
- Make sure wp-admin pages are not cached.
- Also avoid caching logged-in WordPress users.
- This can help fix a wordpress upload error caused by old cache.
Step 3: Check Your Current WordPress Upload Limit
- Go to your WordPress dashboard.
- Open Media → Add New.
- Check the maximum upload size below the upload box.
- Compare this size with your theme or plugin file.
- If your file is larger, the limit is too low.
- This means your wordpress file upload limit needs updating.
- You can also check Tools → Site Health → Info → Server.
- Review upload size, post size, memory, and execution time.
Step 4: Increase Upload Limit from Hosting Panel
- Log in to your hosting account.
- Open PHP settings or PHP options.
- You may also see MultiPHP INI Editor.
- Select the correct website domain.
- Set wordpress upload_max_filesize to 128M.
- Set post_max_size to 128M or higher.
- Set wordpress memory limit to 256M.
- Set max_execution_time to 300.
- Set max_input_time to 300.
- Save the changes and test the upload again.
Step 5: Update php.ini or .user.ini File
- Open your hosting File Manager or FTP.
- Go to your WordPress root folder.
- This folder is often named public_html.
- Create or edit the php.ini or .user.ini file.
- Add these values carefully:
- upload_max_filesize = 128M
- post_max_size = 128M
- memory_limit = 256M
- max_execution_time = 300
- max_input_time = 300
- Save the file after adding the values.
- Go back to WordPress and test the upload again.
- If nothing changes, contact your hosting provider.
Step 6: Try the .htaccess Method Carefully
- Open your website files through File Manager or FTP.
- Find the .htaccess file in the root folder.
- Download a backup copy before editing it.
- Add this code at the bottom of the file:
- php_value upload_max_filesize 128M
- php_value post_max_size 128M
- php_value memory_limit 256M
- php_value max_execution_time 300
- php_value max_input_time 300
- Save the file and check your website.
- If you see a 500 error, remove the code.
- This means your server does not support this method.
Step 7: Increase WordPress Memory Limit
- Open your website files using File Manager or FTP.
- Find the wp-config.php file.
- Download a backup copy before editing it.
- Add this code above the final editing line:
- define(‘WP_MEMORY_LIMIT’, ‘256M’);
- Save the file after adding the code.
- Return to WordPress and test the action again.
- This helps when WordPress needs more memory.
- It may not fix upload size limits alone.
Step 8: Upload the Theme or Plugin Manually
- Download the theme or plugin zip file.
- Extract the zip file on your computer.
- Open FTP, SFTP, or hosting File Manager.
- For plugins, upload the folder to /wp-content/plugins/.
- For themes, upload the folder to /wp-content/themes/.
- Go back to your WordPress dashboard.
- Open Plugins or Appearance → Themes.
- Activate the uploaded plugin or theme.
- This can fix a wordpress plugin upload error caused by large files.
How to Prevent “The Link You Followed Has Expired” Error in the Future
Keep WordPress Core, Themes, and Plugins Updated
Update themes, plugins, and WordPress at all times. Updates often fix bugs, security issues, and upload problems. An outdated plugin or theme can create admin errors. Regular updates help your website work smoothly. They also reduce the chance of seeing the link you followed has an expired message again.
Check Your WordPress File Upload Limit Before Large Uploads
Verify your WordPress file upload limit before adding a huge theme or plugin. Go to Media → Add New to see the upload size limit. If your file exceeds the limit, start by increasing it. This can stop an upload error in WordPress during installation.
Use FTP or File Manager for Large Theme and Plugin Files
Don’t use the WordPress interface to upload really big files. Large files can fail if server limits are low. Use FTP, SFTP, or hosting File Manager instead. This method is safer for big themes and plugins. It also helps avoid wordpress plugin upload error issues.
Keep WordPress Upload and Memory Limits at Safe Values
Make sure your wordpress upload_max_filesize and wordpress memory limit are enough for your website. Low values can stop uploads and updates. Safe values like 128M upload size and 256M memory often work well. Ask your host before setting very high values.
Do Not Cache WordPress Admin Pages
Do not cache wp-admin, wp-login.php, or logged-in users. Cached admin pages can send old requests to WordPress. This may trigger the expired link message. Check your cache plugin, hosting cache, and CDN rules. Proper cache settings can prevent many admin errors.
Keep Your PHP Version Updated
Use a stable PHP version supported by your hosting provider. An old PHP version can cause plugin and theme issues. It may also affect uploads, updates, and admin actions. Updating PHP can improve speed, security, and compatibility. Always test major PHP changes safely.
Use a Staging Site for Major Changes
Use a staging site before making big changes. This is helpful for new plugins, theme updates, and server settings. You can test fixes without affecting visitors. If something breaks, your live website stays safe. This is a smart step for business websites.
Take Regular Website Backups
Maintain frequent backups of your database and website files. Your website is safeguarded by backups in case an upload or update fails. They also speed up your ability to bounce back from blunders. Make use of automatic backups whenever you can. WordPress troubleshooting is far safer with a recent backup.
Avoid Leaving Admin Pages Open for Too Long
Do not leave WordPress admin pages open for many hours. Your admin session may expire during that time. When you click save or upload later, WordPress may reject the action. Refresh the page before making changes. This helps prevent expired session issues.
Conclusion
The “the link you followed has expired” error can look confusing at first. However, it is usually linked to upload limits, cache issues, plugin conflicts, hosting rules, or an old admin session. Start with simple checks first. Refresh the page, log in again, clear cache, and check your wordpress file upload limit.
If the issue continues, review the wordpress upload_max_filesize value, wordpress memory limit, and hosting settings carefully. For users who are not comfortable editing files, WP Chat Support provides WordPress support guidance for upload errors, plugin issues, and website troubleshooting. You can contact WP Chat Support at +1 888 602 0119 for help with WordPress-related issues.
James is an experienced WordPress and WooCommerce specialist with over 10 years of practical experience. At WPChatSupport, he creates clear guides that help website owners fix WordPress issues, improve speed, secure their sites, and manage WooCommerce stores with confidence. His expertise includes store setup, plugin configuration, theme customization, payment gateway integration, and website troubleshooting. Through simple and helpful content, James supports users in solving technical problems and following best practices for online business growth.